Pose for a picture in Excel
- Shem Opolot
- Jun 15, 2022
- 2 min read
POV: You want to share information from Excel with a colleague without sharing the whole workbook.
Did you know Excel has a built-in camera? Let's get started!
But first, here is this week's YouTube video because you love and support my channel:
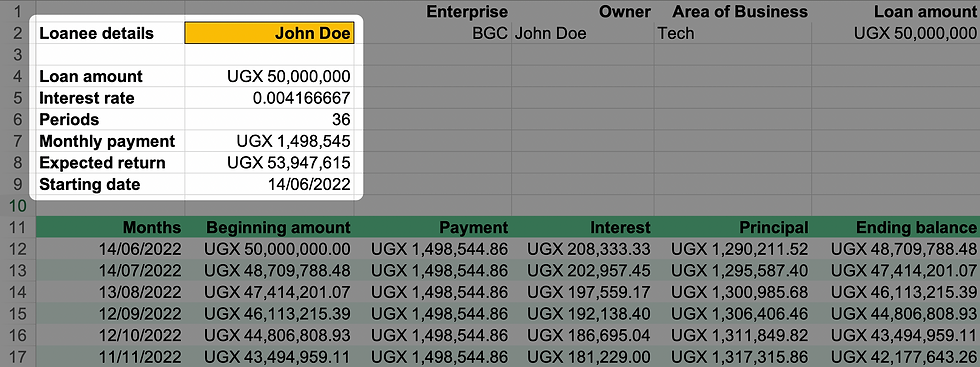
Okay. Take a look at the data in the spreadsheet below. What if we want to share only the highlighted data in the top left corner?

1. Add Excel's built-in camera to the Quick Access toolbar
The Quick Access toolbar is found in the top left corner of your Excel spreadsheet.

To add the Camera to the Quick Access toolbar, click the 3 dots in the Quick Access toolbar, and select More Commands to open the Ribbon & Toolbar menu. The Ribbon & Toolbar menu will open in the Quick Access Toolbar pane. In the dropdown, select All Commands instead of Popular Commands, and find the Camera in the long list. Once you find the Camera, click on it, click the right-facing arrow to add it to the Quick Access Toolbar, and click Save.

The Camera is now in the Quick Access Toolbar

2. Select the data you want to capture and click the Camera icon. The infamous green crawling ants appear around our data

3. Click anywhere you want to place the image in the sheet or workbook.
Your image is ready. You can copy and paste it into a report, email, or WhatsApp text 😉.

How do I use this feature?
1. When I want to create a table in Excel first, make it look pretty, then place it in a report. For example, the table I added in last week's post about road traffic incidents. Sometimes the native table features in Word or Google Docs just don't cut it
2. This feature is great because if the numbers change in your selection, the picture updates automatically. This way you can export the final image when you are ready

Conclusion
Who says selfies are all bad? Excel is a vain little system. Try using the camera feature today.
Have a good week!


Comments